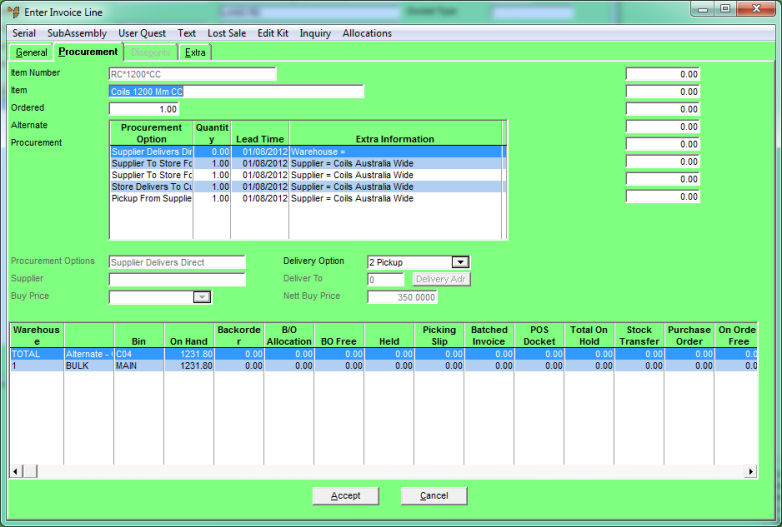
Use this tab to check an item's stock availability and to check and/or change the default procurement and delivery options for an item.
Refer to "Entering Invoice Lines - Supply Chain (v2.8)".
Micronet displays the Enter Invoice Line screen - Procurement tab.

|
|
|
Technical Tip You can press the F11 hotkey to display an item summary – see "Displaying the Item Inquiry Screen" for more information. Select the Exit button when you have finished. |
|
|
Field |
Value |
|---|---|---|
|
|
Item Number |
Micronet displays the item number selected on the Enter Invoice Line screen - General tab. |
|
|
Item Description |
Micronet displays the description of the selected item. |
|
|
Ordered |
Micronet displays the quantity of the item ordered as entered on the Enter Invoice Line screen - General tab. You can change this if required after checking the stock availability in other warehouses at the bottom of the screen. |
|
|
Procurement |
Micronet displays the options for procuring the item as set up in your supply chain configuration (see "Edit - Program - Supply Chain Config (v2.8)"), the quantity to be procured, lead times for each procurement option, and any extra information. This field defaults to the first ranked procurement option with stock availability as defined in your supply chain configuration. You can select a different procurement option if required. When you select a procurement option, Micronet displays more information in the fields below. If you have loaded a quote, the procurement options are automatically reset if the Loading Quotes - Set Qty Delivered field on the Invoicing Configuration screen is set to either Free Stock or Quantity Ordered – see "Edit - Program - Invoicing". |
|
|
|
Technical Tip If you select a procurement option that sources an item from dead stock, make sure you consider the cost of freighting the item. |
|
|
Procurement Options |
Micronet displays the procurement option selected in the Procurement field. If the selected item is a non-inventory item in a non-diminishing category, the procurement option defaults to Stock on Hand as the item should not be placed directly on a purchase order. You can change this to be supplied by a central distribution warehouse if required. You cannot change the Procurement Options to:
|
|
|
Supplier |
Micronet displays the default supplier for the selected procurement option. If you selected to create a manual purchase order, you can change the supplier. Simply delete the default supplier and press Enter to select a different supplier. |
|
|
Buy Price |
Micronet displays the default buy price for the item from the Item master file – see "File - Inventory - Sell Price". If you selected to create a manual purchase order, you can select a different buy price if required. |
|
|
Delivery Option |
Micronet displays the default delivery option. This may be set:
You can select a different delivery option if required. |
|
|
Deliver To |
If you selected to create a manual purchase order, Micronet displays the delivery address for the purchase order. This defaults to the first delivery address set up for the selected warehouse. (These addresses are set up in your Supplier master file – see "File - Supplier - Delivery (v2.8)".)
Select the delivery address for the purchase order then select the Accept button. Micronet redisplays the Enter Invoice Line screen - Procurement tab with the selected delivery address. |
|
|
Nett Buy Price |
Micronet displays the net buy price for the item from the Item master file – see "File - Inventory - Sell Price". |
|
|
[Sell Prices] |
The fields at the right of this tab show the tax exclusive sell prices for the item as set up in the Inventory master file – see "File - Inventory - Sell Price". The price names are set up in your company configuration – see "Edit Company - Edit - Price Names". |
|
|
[Warehouse Details] |
The fields at the bottom of this screen display the stock on hand quantities of the item for each warehouse set up in Micronet. You can check the quantities on hand, on backorder, on picking slips, on POS dockets and on stock transfers, as well as quantities already allocated, quantities on purchase order and total free stock. |
The Discounts tab on the Enter Invoice Line screen is not currently used.
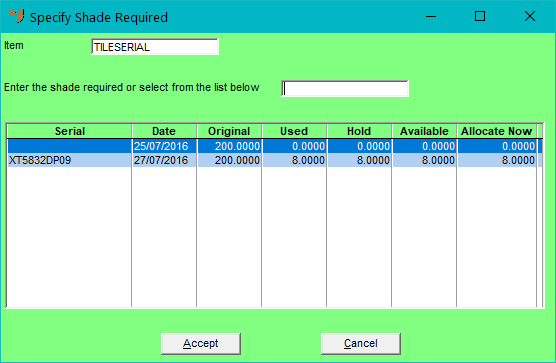
In this case, the screen displays any existing serial numbers for the selected item.

Either double click on the required serial number to add it to the Enter the shade required or select from the list below field. Alternatively, you can type in the serial number you want.
Select Accept when you have finished.
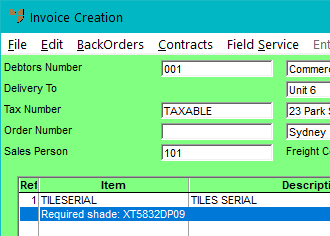
When you return to the Invoice Creation screen, an extra text line is displayed for the required shade.

This text line is also added to the purchase order.